Friday, 9 May 2014

Retargeting research

I wanted to experiment with retargetting motion with constraints from one joint chain to another but as I don't have the motion capture data I'd need yet I've set up some simple tests in Maya.

Firstly I've decided to just try applying movement from one joint to another without any complex rigs in place but then I think it would be a good idea to try and apply the movement to the lamp rig just to check the rig doesn't interfere or vice versa.

I've set up three tests: Uniform movement translation, non-uniform movement and then this multiply node that reverses movement to just double check it does what Norbert says it does (which i don't doubt) but also to check i know how to use it.

First test I've used a parent constraint which seems to work fine so long as you  have the joint chain in the same position as the source but if not then limit the constraints to just the rotation planes, having translation causes the entire joint chain to move and gives undesirable results. And if the joint chain doesn't match the orientation of the joint then again undesirable results are seen in the path of the movement...

I've been reading a paper by Hsieh, Chen and Ouhyoung from Taiwan University:
http://graphics.im.ntu.edu.tw/docs/cadcg05_hsieh.pdf

 Which actually looks at retargetting to different articulated figures and it looks like the best solution they came up with it to make a transition skeleton. This takes away the issues that were had with trying to retarget to a bone with a different orientation. They combat the difference in quantities of bones that make up the skeleton by applying the same motion from one source bone to many target bones. 
They create the skeleton by re positioning each target bone of the transition skeleton to align with each source bone.

While they do align the bones core direction they do not consider the twist in the bones which can lead to some unexpected results.


Thursday, 1 May 2014

Mocap Session

I recently had another session in the MoCap suit this time with Charlie in the suit, hoping to be able to get it up and running using a human template I hit some varied success but the new setup of markers was a little problematic and will need remedying. for example the right leg being tied so closely to the left causes a lot of occlusion which made the time for cleanup lengthy however it seemed that this could be fixed with only one set of markers on the leg being used.

As you can see from this screenshot the template itself did take to the markers and was responding in a reasonable manner.


Even if there were a couple of glitches like his right leg becoming detached...


Overall the main problem that kept recurring was how best to limit the movement. The clingfilm was bound around the upper legs and then again separately around the lower legs to allow for movement around the knees but this still seemed to limit the movement a little too much leaving much of the actions stiff which could affect performance. The clingfilm also slipped out of place moving the markers that were on top of it but this was solved using some double sided sticky tape to secure it in place. The feet wouldn't stay together either but binding them together would have made Charlie a little too unstable as he was already a bit shaky. We did place crash mats around in order to protect him a little and Mike was close by to give physical support if he needed it.

If I go with only using the one leg of markers then I wouldn't need to cling film him at all but it may make the balance look a little off... sacrifices sacrifices...

At this rate it seems much less hassle to just keyframe animate the lamp however it may be more worthwhile for more complex characters.. but maybe not.


Monday, 28 April 2014

MoCap Planning


Original Clip, just something short that will be clear if things go right...or more likely wrong.


77 frames long - 3.2 (ish) seconds

The length isn't so important for matching but it gives me a rough idea for timing when directing the shots. The ability to move as sharp as the lamp can when keyframed might be another issue that is flagged up by this. As usual I'm filling in a shot list so that everything is pre-planned before going in.


Obviously it's just the one shot but I'll need the information there anyway so there's no need to cannibalise what I already have.

The prop to signify the ball I was thinking could basically just be someone giving a visual cue, as it's not being recorded I can add in a virtual ball after. This means I'll need someone else in the room helping me other than charlie in the suit which is common place during regular shoots.

I'd also like to take in a tripod to film the shoot to help show the difference between what was actually captured and what the result was but I'd presume I'll need to get charlie to sign something stating that he is ok with this. 

Mocap suite visit 2 - Human template

I had a few ideas on how to get the custom VST working and calibrated to the lamp setup from last time but after spending a good while on my lonesome in the mocap suite turns out everything I read wasn't quite going to cut it so i gave up on creating a full custom setup and started to try and get the human template to work with the markers I had.

Turns out it can be quite tricky mapping the custom skeleton when many of the markers are different, you have to consider how they are connected to one another and also consider what movement I'm needing to capture.

Below is the information I have available to me, the top is the naming of the markers for the human VST and the bottom is the actual structure of the VST that then would be calibrated to the markers.


I thought maybe adding in extra unnecessary joints to help with the naming conventions might be an option in order to get the markers to link up in a suitable manner however this would give the skeleton a way of bending in a way I don't want. There might be a way of countering this by adding in an extra stick (green and yellow lines in the top image) which seem to be able to restrict movement somewhat but this will need to be something I test when next in the mocap suite. If this doesn't work then I can probably just try and fix it in the retargetting phase but this may be a massive pitfall for the project.

After careful thought I'm going to attempt the setup which involves using the knees as the main bend. The marker setup within the human template will allow for better data capture and range of movement.

The final setup of markers I will be using for this project will be as follows:

This setup allows the human layout to be applied with ease but not sacrificing movement. However the capture will be more difficult to direct as the knees will need to be reversed during retargetting.

Thursday, 13 March 2014

Motion Capture-session one

This session I was focusing on trying to work out custom templates. I also recognized that a major problem I have is overlooking the simple solutions.. like using the help documentation for blade. 

The session had some successes and produced it's own set of problems than need to be looked into before going back into the studio.

The setup we ended up landing on for this session marker wise was as follows:

The three markers on the head would be used for the rotation with their placement helping to track the direction of the face. The translation of the top half would be taken from the distance between those around the shoulders and the hips. The main part of the acting would come from the hip movements. The translation of the bottom half of the lamp would come from the information given between the hips and the knees and then the rotation for the base would come from the ankle and foot markers. The markers were place along the central part of the body especially when placing them on the toes as the legs would be held together some how.


This marker setup proved to have some problems with occlusion and swapping between the marker on the chin and the marker on the chest. This could be solved in two ways:

Either move the central marker on the chest to be on both shoulders like this


Or as was suggested by Norbert, use the multiply node in maya to take the movement from the knee area and reverse it to bend the right way. Eliminating the need for the shoulder/chest markers at all. 


This is a particularly interesting suggestion as it may yield more realistic results in terms of range of movement.

Actually creating the custom skeleton in blade proved to be quite a task. While there is functionality to build your own structure we were unable to find a way of renaming the markers or applying a custom set of bones to them meaning the session didn't result in any actual capture other than the initial ROM

Before the next session I want to look into applying custom bones (probably looking towards dynamic props for a solution) and also test out the ability to apply only the rotation of the source to a target rig to test out that ability.


Tuesday, 11 March 2014

Lamp/human comparisons

As I've chosen to retarget to the lamp rig there's a few things I need to do.

Look at the rig and how its constructed

Figure out how to translate movement from the source data can be applied across (marker placement).

Create motion analysis on how the lamp should move to help inform how successful the final result is.
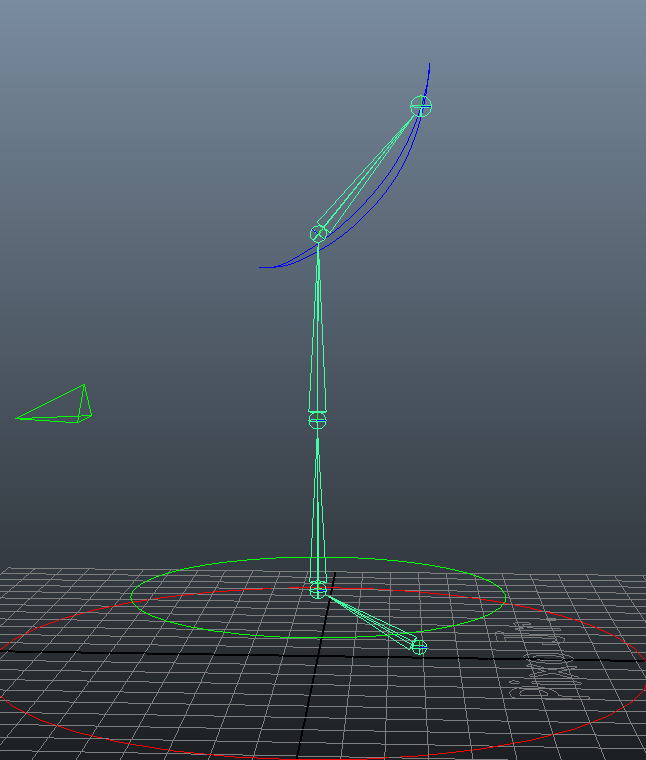
The Rig
So the rig for the lamp is pretty simple in the grand scheme of things which is handy. Also the structure should be useful when figuring out where the markers should be placed in order to get the right sort of movement from the actor during capture.


Marker placement on people

First sort of analysis led pretty easily to this marker setup. It takes into account the joints in the rig and joints on the actor.
But when watching this, one of the poses jumped out as being an awkward one to manage:

the pose seen in the images below demonstrates a couple of issues with the current setup. The first being something that would need to be considered during the capture process concerning props to help with balance when the lamp is over extended. The second being the positioning of the head. The proposed solution in the image below actually might not help at all. At present there are five joints driving 2 in order to control the head but this might cause some issues for head mobility. I'd like to try some posing tests where I take images of the lamp in various poses and then get people to replicate them. This might help highlight some more issues that might need to influence changes to the marker system or more need for props during capture. I'll be paying close attention in particular to the head movement.
Motion analysis Lamp movement.

I've done a bit of motion analysis for lamp movement based mainly on Luxo Jr in the Pixar short. I also tried to look for movement which had a similar structure and it led me to believe that the best reference of movement for an angle poise lamp would probably need to come from a three legged cat with the front leg being the one thats missing. This is due to the bone structure of the front of the leg, neck and head, the agility a cat poses and the weight needed to be placed on the single limb to add emphasis (although a regular cat was working out fine)

While doing this motion research I started to consider how to measure success and I came to the conclusion that the best way of testing would be probably to hand animate a scene with the lamp rig I have and then try and get the motion capture to be able to achieve a similar thing. So there's a task that I need to do pretty promptly.


Later today
Technical side, looking at creating a custom vst (vicon skeleton template) I think it might involve manually labeling the markers in order to achieve something but i'm wondering if you can use the human skeleton and then just not record some parts.. would it complain?

By using the existing human template but then labeling the markers wrong (to give the illusion of the lamps structure) might give interesting results in the viewport but using selective retargetting later on in the pipeline this could prove to be a beneficial technique. Further more if you could choose to turn off certain limbs such as you can do with some rigs in maya in order to gain better visibility on the current focus this might limit the distraction of the parts of the existing template that aren't labelled in the traditional manner.

Things I want to try (in a more concise manner)

  • Selective markers applied to existing human template (traditional labeling, i.e. the hip is the hip)
  • Attempt to make a custom template (although i've found no help online in regards to doing this)
  • Complete skeleton, using existing template that labels in a way that forms structure of lamp within viewport (likely to be messy)


Extra thoughts:
Adding more subtle performance. Performance is still a major factor in what this project is trying to achieve. Ending up with a lamp that moves technically correctly is what I'm hoping to build on using this process which is why certain aspects are being considered.
For movements in the neck it might be nice to use the extra joint to influence the angle between 2 and 3.. maybe giving the option of blending between the two angles during the cleanup process? this could help to plus the performance at key moments.


Arms need to be kept from helping to add movement.. knees need to be kept together but not sure how the distance between the hips and the ankles can be kept consistent... might need to re consider where the markers are on the lower section of the body. 


Monday, 3 March 2014

Pipeline focus

Things have changed somewhat to help fit within the scope of my abilities and the time allowed. I knew i would struggle to sort out a small project but this has been a little ridiculous. Here's a brief summary of the new plan.


Redefine project to just one pipeline with tweaks.

Split into three parts, Pre capture, Mid Capture and Post Capture

Pre: Templates within Vicon Blade to help with varying structure, encompasses the technical side of setting up a motion capture session in order to accomodate for non human rigs

Mid: Augmenting the data using props and acting techniques

Post: Most likely using spline IK and lattice deforms to help constrain the data to the appropriate motions.


More research needed into "Pre" phase. So far have been looking into what information on the template function in vicon there is, it seems like most of the documentation is concerning human biped setup. There are tools to help label the markers appropriately in relation to one another. It could be as simple as figuring out which markers should be labelled as what in order to reconfigure the template to be suitable for non human subjects. This would need a little extra research into anatomy of the creatures intended to be used as rigs in order to help assess how best the markers should be laid out.

Having spoken to Norbert, I know know that adapting the skeletons to go into the appropriate creature shouldn't be all that difficult. The translations of the bones aren't recorded apart form the root joint so the rotations are the only things that'll need to be considered when capturing and establishing the range of motion. Again this will need to focus around the motion analysis to help inform marker placement.

I will only need one rig other than the human control. So I think for time sake the angle poise lamp may be the best option as the sort of anatomy is pretty self explanatory due to the joints it has. It's range of movement should be pretty explanatory too.

I have a mocap session scheduled for either Wednesday or Friday (Update: Friday confirmed) to allow for messing with templates. I'll book another for sometime after that to actually acquire the footage for the mid and post sections of the pipeline.

I think I'll be using the lamp as its the most non human with a load of reference footage for one being animated well (Pixar) I've started to do little motion studies on how the lamp moves and what motion it mimics. I'll upload scans later on as I'm using my personal sketchbook to do these in.